Sunday, December 4, 2016

Chapter 1: What if...?

In one of my classes recently, we were talking about privacy and facial recognition technology. We watched a very interesting video showcasing some of the facial recognition capabilities available today.


I had recently been playing with a Raspberry Pi, and this inspired me to wonder what kind of facial detection and recognition capabilities someone like myself, a student, could create using cheap off the shelf components. At about this same time, in a different class, we were given the details for a final semester project. Inspiration struck, and One Way Meetings was born.

The original idea was to install a Raspberry Pi running Windows 10 IoT along with a GPS device and webcam in my car. We had a family vacation coming soon to visit some friends, and I wondered how many faces it could detect, using standard Microsoft API face detection routines, from the back window. I figured I could log those faces, along with GPS locations, and create an experimental locative media documentary of our journey.


Chapter 2: Raspberry Pi, Windows 10, and Me

Over the next couple of weeks, as our vacation approached, I scrambled to get my device working. I found a webcam for $4 at the local Goodwill Computer Works store which functioned with Windows 10 IoT (This is actually pretty amazing because there are only about four webcams Windows 10 IoT claims to be compatible with).
$4 is a pretty good deal for one of these. They are quite a bit more on Amazon.

I also purchased a GPS module, a u-blox NEO 6M, from Amazon.com which I wired up to my Pi.

My Raspberry Pi 2 connected to the u-blox NEO 6M
I tested my contraption at home with optimistic results. So, I decide to take it out and try it in my car. I employed a USB battery charging pack to run the Pi.

The inside of my Raspberry Pi box along with the GPS module and the 7" display
The Raspberry Pi along with the USB Battery module.

Unfortunately, it was at this time things started to go wrong. I never determined exactly what the cause was. I think it was either too few amps for the whole contraption or a corrupted SD card. Either way, I started routinely getting the following screen:
The most frustrating screen in the world. Intermittent, even after reinstalling Windows 10 a couple of times, it wouldn't completely go away.
As the time for trip was approaching, I eventually gave up on using the Raspberry Pi in the car for the project. I just didn't have time to get it working robustly. So, I shifted to using my old Dell Venue 11 Pro.

This is a near final version of my UWP (Universal Windows Platform) app running on my Pi before I gave up.

Chapter 3: Experimentation

My Dell Venue 11 Pro running the latest version of my app
Once I shifted to using the Dell Venue 11 Pro tablet, things started working in the car, but I ran into other difficulties. For starters, I had to purchase another GPS device, one which would work with Windows 10 via USB. I found a u-blox 7 GLONASS/GPS device for a pretty good price on Amazon.
u-blox 7 GLONASS/GPS


I also spent another $4 at Goodwill Computer Works. This time, I bought an HD (720p) capable Logitech C270 Webcam. This camera turned out to be pretty capable. Most of the webcams I bought during the project were limited to 640x480 resolution while this one could handle 720p (1280x720) at 30 fps.

The Logitech C270
 Face detection at home was working okay, but I quickly discovered, in the car, it was never being triggered. So, I decided to add a couple more photo triggers. First, I set up a button on the screen. When clicked, it would cause a photo to be taken (and the corresponding location logged, of course). Also, I set up a timer. Originally, it was set for about two minutes. When it went off, the device would automatically take a photo.
This photo was taken automatically via timer.
This image was captured manually. I had the Dell on the front seat next to me while I was driving, and I could tap a button to quickly snap a photo from the camera.


I even experimented with having the timed photos take a sequential batch. My thinking, at the time, was to turn those batches into animated .gifs. The results were fun, but I ultimately decided not to pursue this option.
An animated GIF based on the sequential photos I was taking from the timer.


Chapter 4: Execution

Finally, we set off. It was the day before Thanksgiving, and we left the house around 5:00 AM. We had to make a stop at my parent's, but when we left there, the program was running. The first photo was taken at 5:33 AM.
5:33AM - Even taken from the night vision camera, this is not much to look at. This was triggered manually.
I had modified the program so it could now handle two web cameras simultaneously. Both had face detection active, and both would create a log of all photos along with what triggered them, their GPS location, and the time the photo was snapped.

Night vision mode turned out to be unimpressive:
Note: IR (Infrared) reflects off of a window just like any other light would.
 After awhile, the sun came up, and I realized my positioning of the forward facing camera was not quite idea:
Not the best camera placement in the world.
I tried to make some adjustments to the camera, and I ended up triggering the face detection:
Probably not the most flattering selfie in the world, but maybe the most complicated?

 After a couple of stops and adjustments, I got something better:
Finally, a decent camera angle from the dashboard.
The other camera, meanwhile, had been snapping photos out the right hand window.
Choctaw Casino
Some building...?
I pressed the manual trigger buttons a lot. Anytime I thought there might be something interesting if I could time it right. I ultimately ended up running the first few hours on my MacBook Pro until the power inverter I was using to charge it started overheating. Then, I ran the rest on my Dell. Amazingly, it worked, even detecting a face or two along the way:
I just want to know: Why was it detecting this as a face when it wasn't detecting so many others?!
Data collected, it was time to move onto the final stage of the project.

Chapter 5: Putting it all together.

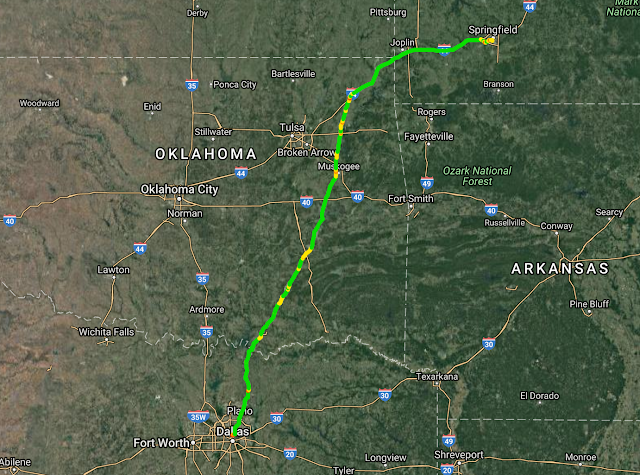
The final route with no images included.
In the end, I was able to take all of the data and export it to KML file useful in Google My Maps or Google Earth. I am placing them on a separate page for convenience. I have created a few varied versions for you to peruse. The route itself is color coded red, yellow, and green to indicate speed based on time of travel between each logged location. I personally suggest you download the large KMZ file for Google Earth, put on some music, and sit back and take the tour.

I chose the name "One Way Meetings" for this site when I thought I would get more face detected images. I hoped to capture the faces of unsuspecting passers-by in their cars or on street corners. I hope it provokes you to thinking about what it means when police erect cameras on almost every street corner in a city, on their bodies, or on their squad cars, practicing facial detection and recognition techniques with them. Or, when companies have them erected over every entrance and corridor, be it for a small gas station or a large business institution. According to the Georgetown Law Center on Privacy & Technology, half of Americans have their faces already in a law enforcement facial recognition database. Law enforcement is able to do this because, when we are out in public, in our cars or on the street corners, we have no reasonable expectation of privacy.

Police around the country are becoming increasingly militarized at an alarming rate. They are simultaneously being given access to unprecedented levels of surveillance which cover a broad swath of the American public with very little accountability. They are often receiving little or no training in how to properly deploy these. The potential for abuse rises, and we increasingly approach a time where the only thing separating the free citizens of the United States from an era of authoritarian dictatorship are words on paper and the will of men to obey them.

< Start at the Beginning